I am so excited to recommend Custom Frames Canada for my prints.
What excites me most about their frames is that you can specify any length and width and they will make it for you! No more wandering shops looking for a frame to fit your print only to find the frame you like doesn't match the size!
They also have lots of options available in all sizes.
I also get a small commission with them if you use my discount code. You get 35% off if you use the discount code "JOANNEHASTIE", so I think it is a win-win in that regard.
https://www.customframescanada.ca/discount/JOANNEHASTIE
You will need to order backing board and optional non-glare acrylic clear panel for each of the frame size you order. Make sure to double check the size match before purchasing!
For my initial order I ordered 9 frames. 4 white frames, 4 light wood frames and 1 dark wood frame. I was planning to have them all the same thickness, but they were out of one of the sizes I wanted, so I sized to a thicker frame. It turned out they look great together as it gives my gallery wall a bit of dimension.
To frame, I recommend the following tools:
- flat head screwdriver (to lift the metal tabs)
- When installing the D-Rings (not in this tutorial, you will need a Philips or Robertson screw-driver depending on the mounting screws you have)
- a blanket to place the frame or plexiglass on when work is being done
- masking tape or green painters tape
- I didn't use the ruler for this frame but I have for other frame jobs, so it it is a nice to have

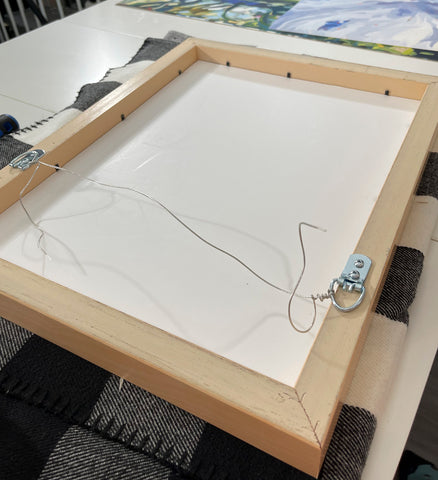
I mentioned I had already installed the D rings because I hung the frames before I decided which print to install. Here is how they look, I inset the mount towards the inside of the frame, to make sure the D-ring is hidden from the edges when the frame is hung.

Here is what the wire + D-rings look like from both sides, Note that the frame is currently face down on the blanket to protect its outside/front face.

Use the flathead screw driver to lift the tabs all around the back of the frame.

Out will come the acrylic clear panel and the white foam board. I ordered both of these seperately from Custom Frames Canada to go with my frame.

I recommend using double sided tape. If you don't have double sided tape use green painters tape. I was out of both, so I used masking tape.

I put tape on the foam board sticky side up. I use small pieces of tape to secure the up-facing tape to the foam board. This is my hack if you don't have double sided tape. It won't be as secure, but since the canvas print is clamped between the plexiglass and foam board, it is just enough to keep it secure while placing it face down in the frame.

Placing the print down onto the sticky side up masking tape.

Next step is to work with the plexi-glass. You will need to remove the protective film from both sides. I made sure the plexiglass was on the blanket so I did not scratch it.

One side removed...

The other side removed:

I then place the plexi-glass back into the frame.

I then lay the print which is secured onto the foam board into the frame. Before I secure the tabs I peak to make sure the print is not upside down. That has happened many times to me before after I secured the tabs. OOOPS!

Tabs are up. Note that the frame is once again on the blanket.

Use that flat head screwdriver to bend the tabs back down again to secure the foam board.


Your frame is now ready to hang.

Here is the print with the other framed prints.

These frames are only available in Canada. But many frames are similar to this, so hopefully this blog post inspired you to install your print yourself.
If you wanted to see how the prints get installed with a white mat, check out this post where I show you how to frame with IKEA HOVSTA and RIBBA frames.
To see all the un-stretched canvas print collection, click here.
Once again if you wanted to purchase these frames with my affiliate link and get 35% off please use the discount code "JOANNEHASTIE"
https://www.customframescanada.ca/discount/JOANNEHASTIE
